Showing posts with label cake. Show all posts

Monday, 26 September 2011

Super Moist Chocolate Cake

This particular cake is also known as Devil's Food - I'm guessing because it is so wickedly delicious!!!


Super Moist Chocolate Cake


Recipe Type: Cake

Prep time: 5 mins

Cook time: 20 mins

Total time: 25 mins

Serves: 24

Ingredients


  • 2 cups Sugar

  • 1 teaspoon instant coffee

  • 1/4 teaspoon salt

  • 3/4 cup Cocoa

  • 2 cups Gluten Free Plain Flour

  • 1 teaspoon Gluten Free Baking Powder

  • 1 teaspoon Bicarbonate of Soda

  • 250ml Hot Water

  • 250ml Milk

  • 250ml Oil

  • 2 Free Range Eggs

  • 5ml Vanilla Extract


Instructions


  1. Place sugar, salt and coffee in a mixing bowl. Add sifted cocoa, flour, baking powder and bicarb. Add water, milk and oil. Mix on slow to wet the ingredients, then increase speed to medium and mix for 2 minutes.

  2. Add eggs and vanilla, mix on medium for a further 2 minutes

  3. Place into cupcake cups and bake for 20-25 minutes or until an inserted toothpick comes out clean.

  4. Cool on a rack. Enjoy!


Tuesday, 29 March 2011

Left Over Cake

What to do with left over cake?  There are a million and one different things that you can do, but this one would have to be one of my family’s favourites.  I often have trimmings left over from my sculpted cakes, and after events like the Annual Nana Glen Market Day, I usually have a heap of left over cupcakes (over catering is in my blood!)  Sometimes I freeze them for the girls’ school snack or afternoon tea, other times I make cake balls, but now that the weather is cooling down, cake pudding is well and truly back on the menu!  It is super easy, super yummy, and microwaves up a treat for breakfast if I  really feel like spoiling the kids!

First of all, preheat your oven to 180oC, then grease a deep baking dish.  Next break up all your left over cake into chunks.  If it is plain cake, I like to throw in chocolate chips or jam dollops to really make it delicious!

Now all you need to do is make a quick baked custard mix.  I do this by whisking together 4-5 eggs, 3 tablespoons of sugar, a teaspoon of vanilla and a pinch of salt.  Once they are mixed in really well and the sugar is almost dissolved, add 900ml milk.  Mix it in thoroughly then pour it over the cake.

Finally, take a larger baking dish and put a tea towel or cloth in the bottom, place the dish with the cake inside, then pour boiling water into the larger dish until it comes halfway up the sides of the smaller dish to make a water bath.  Place them in the oven and bake for 45 minutes to one hour, or until the custard has set.


All that’s left to do now is serve it up and tuck in!  It is especially yummy with whipped cream or ice cream!  The bits on top that are poking out of the custard go all crispy and crunchy while the rest of it is a beautiful pudding consistency.


Super quick, super easy, and super yum!

PS Sorry the photos aren’t very good, but it was late on a school night and I was rushing!

What is your favourite way to use up left over cake?

Monday, 28 February 2011

Yes, I love cake!

Okay, I admit it, I love cake.  I’m not a big cake eater, but I am still a cake lover.  They are such beautiful things to look at and I love to dream about all the different flavour combinations out there.  They are lots of fun to make and can be decorated in a gazillion ways.  I’m guessing I’m not alone in my passion, whether you love cake to eat, to look at, or to bake, use cake lovers come in all types!

Look what I found by Easy Cake Ideas!  The perfect way to declare your love to the world!  You can choose from t-shirts, bags and aprons and they have heaps of cool sayings too, like “A Life Without Cake is No Life At All”, “Save The Earth, It’s The Only Planet With Cake”, “Love, A Temporary Insanity Cured With Love”, “Is Life Worth Living?  It All Depends on The Cake” and “Nothing Great Was Ever Achieved Without Cake”.  Or, you can keep it plain and simple with


Which one is your favourite?

Saturday, 8 August 2009

First Fire in the Pizza Oven!!

Woohoo!  It has finally happened, the last brick is in and the dome is complete!  Friday night DH lit the first small test fire inside the oven to see how it would go.  Went great - only a small fire, but reached 250oC easily.  We had friends come over for a feed and to watch (of course) and rang the neighbours over the road to come and check it out.  Lots of oohs and aahs and "how long til we get a pizza".  We even turned on the fairy lights around the gazebo next to it for a bit of ambience.  Gorgeous!  He has done a fantastic job, especially for someone with no brick laying experience.  Our friend's uncle even thought he was a brickie!!
August 7Last night we lit the second fire, a bit bigger this time and it went up to 340oC.  He is a clever  boy - even installing a probe thermometer through the wall during construction so we can keep an eye on the temperature.  He is now going to put 3 layers of render over the top with vermiculite in the second layer as extra insulation, and will tint the final layer an earthy reddish brown - think Uluru at sunset.  Once that is all finished, I get to have my turn with the decorating.  Originally I was going to do a mural...but, as we live in a little hamlet called Nana Glen, named after the 2 tailed lizard (a naturally occurring mutation of a very common lizard that the local Aboriginal tribe call Nana), I am going to attempt to make a large 3d sculpture of a August 7 (3)2 tailed lizard draped over the dome of the oven.  Come on, since when did I ever go for an easy, subdued option - it has to be over the top or not at all!!  (Kinda like my cakes lol).  Hopefully I'll figure out how to do it as I go along as I have never attempted sculpture before except for a mammoth head out of foam rubber for a play in high school (and even then I had an art teacher helping!!)  I'll be sure to take lots of photos and post them up as I go.  I am also thinking I might do a bit of a write up on DH and how he built the oven as we took lots of photos along the way, right from the laying of the slab and the kids imprinting their handprints!!  It even has wood stowage underneath!
So, Tuesday night is our very first

pizza night!  I am going to try out a new recipe for the dough to celebrate, and now I have to start thinking about what toppings - they have to be special as occasions don't come much more special than this!  I am SOOOOOO excited!!

Friday, 24 July 2009

Theobromine - That Part of Chocolate that Makes You Feel Good!!

Well, I'm stuck at my parents' house on "holidays" (and I use the term very loosely) with the dreaded swine flu. I am literally under house arrest with 2 small children to amuse who just want to go home and see their chickens.  How to entertain them and myself? Make a completely edible molecular model of theobromine of course! My brother, aka Scon, told me about this site a while ago and said I should really check it out, especially the foodie bit. Like him, I am a bit far down on the geek scale...probably a bit more nerd than geek though, I dig the chemistry/biology more and get a bit lost with some of the IT, but hey, what a cool site!  Anyway, enough rambling, here we go. This took place over 2 days as energy levels and compulsory rest (and vomit) breaks required!! Oh yeah, and in case you didn't know, theobromine is the active chemical in chocolate (higher in dark chocolate) that makes you feel good! If you are wondering where the "bromine" molecule is, you won't find it, it is named from the cacao plant Theobroma sp.

Nana Glen Mum's Edible Molecular Model of Theobromine

PART 1 - CAKE

This recipe is from "cakepro"  at Cake Central

Ingredients

2.5 Cups Flour

1.5 Cups Sugar

3 Tablespoons cocoa

0.5 teaspoon salt

1.25 teaspoon bicarb soda

1 Cup Butter

2 Eggs

1 ounce red food colouring (I omit this)

1 Cup Buttermilk (I just use normal full fat milk)

1 teaspoon Vanilla

Directions

Preheat oven to 180C.

Sift dry ingredients and set aside.

Beat butter and sugar in electric mixer until light and fluffy. Bet in eggs on at a time and add colouring (if you are using it). Add vanilla. Add half the flour, all the milk, then the rest of the flour, mixing as little as possible to combine.

Pour the batter into 2 round pans (I just put it in one big rectangular one as it is going to get broken up anyway) and bake for 35-45 minutes (depending on the size of the pan). Cool in pan for 10 minutes then turn out onto a cooling rack.

Let it cool

Now for the fun part, get those hands in there and gently break it up into lots and lots of little crumbs!! Put it aside and make the frosting.

PART 2 - FROSTING

This recipe is from "Carol" at Cake Central

Ingredients

225g Cream Cheese, softened

56g Butter, softened

1 Tablespoons lemon juice (I used lime)

1 Teaspoon vanilla

5 Cups Icing Sugar Mixture (not pure icing sugar - it will set too hard)

Directions

Beat cream cheese, butter, lemon juice and vanilla together until smooth and fluffy. Add sugar in 2 batches.

PART 3 - SHAPING

Gently fold the frosting into the cake crumbs. YUMMY! Be sure to taste it at this stage (no reason - just cause it tastes good!!) Shape the mixture into balls and place onto a tray lined with baking paper. I made my balls in 4 different sizes to represent the 4 atoms that make up the molecule.

PART 4 - COATING Ordinarily when I make cake pops (and all credit here goes to Bakerella for the COOLEST cake pops ever!!) I just coat them in melted chocolate, which I did for the smallest balls (Hydrogen). They were nice and easy. I just melted some white chocolate over simmering water, dropped them in and scooped them out and left them on a tray to cool and set. For the rest, I wanted colour, and as I am housebound at the moment, I had to make-do with what I could find in Mum's pantry, so sugar and food colouring to the rescue! I made up some toffee and coloured it with your regular supermarket food colourings. Here's how:

Ingredients

0.25 Cups Sugar

1 Cup Water

1 teaspoon Glucose

Food Colouring or cocoa

Directions

Place water, sugar and glucose in a small, heavy based saucepan and stir until ALL the sugar has dissolved. Bring it to the boil and STOP STIRRING immediately! With a pastry brush dipped in water, brush any crystals off the inside of the pan. Boil for 20 minutes until a spoonful of toffee dropped in a glass of cold water makes a "crack" sound and forms a hard ball. Take it off the heat and add a few drops of colouring or 2 teaspoons of cocoa. Carefully drop one ball in at a time, turning it over with a fork to evenly coat, then drain the excess toffee from it and place the coated ball on a lined tray to cool and set.

PART 5 - ASSEMBLY

Now for the fun part! Grab a heap of toothpicks, a metal skewer, a candle, a box of matches, tray and either baking paper or a silicon mat. Because the toffee dries hard, there is no way you can push a toothpick in without shattering it...ask me how I know!! So, you light the candle with the matches and hold the metal skewer in the flame for a few seconds then push it through the toffee shell into the cake centre, wiggle it around a bit, take it out and you have a hole just the right size to poke your toothpick in! Yippee it works! Assemble molecule as desired. So folks, after much ado, here it is, my edible molecular model of theobromine. A cooking and chemistry lesson all in one for the kids (pity they are only 4 and 6 - I think the science was a bit lost on them - but they loved the taste!!) In case you are wondering, the small white chocolate balls are the Hydrogen, the blue ones are Nitrogen, the red are Oxygen and the black (cocoa) ones are Carbon.

Friday, 10 July 2009

Fishing Boat Cake

Tinnie Cake view 1My friend's daughter turned 11 the other day and I offered to make her a cake.  It turns out she is saving up to buy herself a little fishing boat, so naturally, that is what the cake had to be! I made a 23cm square mud cake and covered it with Fluffy Frosting which has a lovely smooth and almost shiny finish - not matt like most icings.  I then made up some Piping Gel Tinnie Cake view 3from caster sugar, cornflour, lemon juice and water and dyed it with blue and green colourings for the water.  All the other decorations were made from fondant.  It ended up being a really easy cake to make and transport, and a quick dusting with silver lustre on the boat gave it a nice metallic effect.  Needless to say, she loved it!!Tinnie Cake view 2

Monday, 20 April 2009

Thomas the Tank Engine Cake Tutorial - Part 1- How I did it.

Thomas the Tank Engine (2)

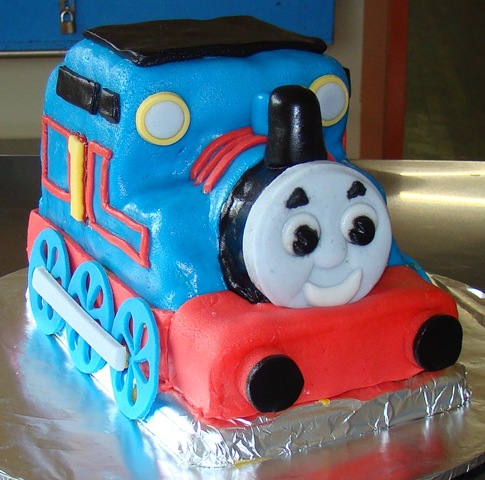
Well, here I go.  Miss M turned 4 at the start of the month, and like any unconventional little girl, opted out of fairies and princesses for her birthday cake and insisted on Thomas the Tank Engine.   No great surprise since she lives, eats and breathes Thomas.  I have to buy her underwear in the boys’ section because sh

e insists on Thomas undies like her friends (boys) at preschool.  She wears Thomas pyjamas to bed and Thomas t-shirts to preschool.  Everyday she plays with her Thomas train track (talk about value for money mind you!!) and so on it goes, I’m sure you are getting the picture!  The surprise for me though came when she SAID NO TO CHOCOLATE CAKE!!!! and insisted on CARROT CAKE! I kid you not!  You could have knocked me down with a feather!  Anyway, here is how I went about it…

I had read that it is easier to carve your cake if you freeze it first.  I’m guessing it depends on the type of cake.  The carrot cake turned out hard as a rock (and I have very sharp knives) and was very difficult to cut.  My suggestion would be to cut the cake and then freeze it before icing to stop crumbs getting into the cake.  I’ll try that one myself next cake and let you know how it goes.  I have to make a Lightning McQueen this week for Miss M’s friend.

I baked the cake in a square slab pan and cut it into two equal rectangles.  I contemplated baking it in 2 loaf tins but decided against it as loaf tins tend to have sloping sides.  I then put one half to the side for later.Step 1 Top

Step 1

With the half I was working with, I cut it in half laterally to make it lower ie cut

the top half off the bottom half so it looked like this:

After that, I just pretty much broke Thomas down into a series of squares and a circle at the front at stuck them all together with buttercream.  Here comes a photo series of what I did.  I tried to get a couple of pictures of each stage from various angles.  Hope it’s not too boring or repetitive.

Step 2

From the half I had put to the side, I cut it in half lengthways ie front to back and placed on half on top, aligned at the back.

Step 2 Top Step 2 Side

Step 3

Using a circle cutter, I cut a round and placed it in front of the piece from Step 2.

Step 3 Top Step 3 Front Step 3 Side

Step 4

Using a circle cutter, I cut a second round and placed it in front of the piece from Step 3.

Step 4 Top Step 4 Angle Step 4 Front Step 4 Side

Step 5

From lower cake half, I cut a strip and placed it on top of the large block, again aligned at the back.

Step 5 Top Step 5 Angle Step 5 Front Step 5 Side

Step 6

From the higher remains, I cut another block, but lowered it slightly and placed it in front of the piece from Step 5.

Step 6 Top Step 6 Angle Step 6 Front Step 6 Side

Step 7

I put small squares beside the first round.

Step 7 Top Step 7 Angle Step 7 Front Step 7 Side

Step 8

I cut 2 1/4 circles and placed them in front of the squares from Step 7.

Guess what…all done!  Not to hard at all eh?  Now it’s your turn – be sure to send me photos!

Step 8 Top Step 8 Angle Step 8 Front Step 8 Side

I didn’t take photos of how I iced the cake.  As we live out in the country, I can’t buy fondant so I have had to make my Thomas the Tank Engine own.  I found an excellent recipe at Gingerbread House Heaven.  I used their Professional fondant recipe and had great results even though our relative humidity was excessive – we were actually flooded in for 3 days while I made the cake!  Luckily the water dropped and the roads opened in time for the party!  I did the blue first and worked my way forwards.  I made the wheels a few days earlier and dried them out completely so they were nice and hard, and then just stuck them on with a bit of left over buttercream.  I sat the entire cake on a foil lined biscuit tin lid to raise it slightly off thecake board so that the wheels looked about the right level.  As for the face, I had read another great tutorial over at Thomas the Tank Engine Tutorial
Technorati Tags:

and was going Thomas the Tank Engine (3) to try and sculpt the face myself, but wimped out because my sculpting skills are very very ordinary!  I got some oven bake polymer clay and made an imprint with one of Miss M’s toys.  She has a puzzle that has plastic pieces that make a front on view of Thomas.  I took the face piece, pushed it into the clay and baked the clay to make it hard.  When I was ready to make the face, I coloured it grey, then pushed Thomas the Tank Engine (4) a big piece over the mould and rolled it slightly with a rolling pin for even pressure.  When I pulled the fondant off the clay, I had a wonderful 3 dimensional face!  I used a round cutter (the same one I used for the circle pieces of cake so they were a perfect fit) to cut the face out, and then just added in the coloured details.  It actually turned out to be quite a simple exercise once I broke it all down.

So now you know how to cut up the cake and put it back together again, you'll be ready to ice it.  Here is how I covered the cake in Part 2 of the tutorial.

Anyway, I hope you have found this helpful, and if you actually know what you are doing, I would love to hear about how I can improve my cake decorating – especially getting my fondant nice and even – it always has lots of lumps and bumps.