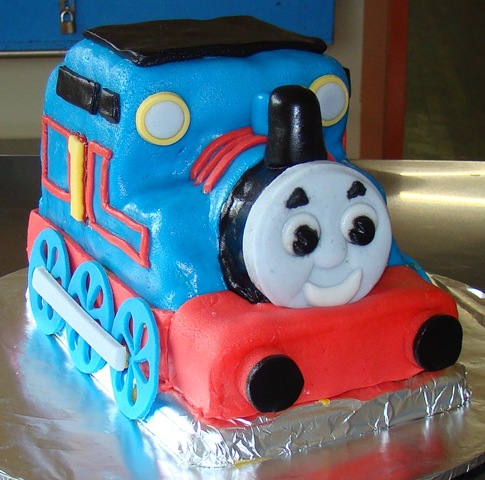
Well, here I go. Miss M turned 4 at the start of the month, and like any unconventional little girl, opted out of fairies and princesses for her birthday cake and insisted on Thomas the Tank Engine. No great surprise since she lives, eats and breathes Thomas. I have to buy her underwear in the boys’ section because sh
e insists on Thomas undies like her friends (boys) at preschool. She wears Thomas pyjamas to bed and Thomas t-shirts to preschool. Everyday she plays with her Thomas train track (talk about value for money mind you!!) and so on it goes, I’m sure you are getting the picture! The surprise for me though came when she SAID NO TO CHOCOLATE CAKE!!!! and insisted on CARROT CAKE! I kid you not! You could have knocked me down with a feather! Anyway, here is how I went about it…
I had read that it is easier to carve your cake if you freeze it first. I’m guessing it depends on the type of cake. The carrot cake turned out hard as a rock (and I have very sharp knives) and was very difficult to cut. My suggestion would be to cut the cake and then freeze it before icing to stop crumbs getting into the cake. I’ll try that one myself next cake and let you know how it goes. I have to make a Lightning McQueen this week for Miss M’s friend.
I baked the cake in a square slab pan and cut it into two equal rectangles. I contemplated baking it in 2 loaf tins but decided against it as loaf tins tend to have sloping sides. I then put one half to the side for later.

Step 1
With the half I was working with, I cut it in half laterally to make it lower ie cut
the top half off the bottom half so it looked like this:
After that, I just pretty much broke Thomas down into a series of squares and a circle at the front at stuck them all together with buttercream. Here comes a photo series of what I did. I tried to get a couple of pictures of each stage from various angles. Hope it’s not too boring or repetitive.
Step 2
From the half I had put to the side, I cut it in half lengthways ie front to back and placed on half on top, aligned at the back.


Step 3
Using a circle cutter, I cut a round and placed it in front of the piece from Step 2.


Step 4
Using a circle cutter, I cut a second round and placed it in front of the piece from Step 3.


Step 5
From lower cake half, I cut a strip and placed it on top of the large block, again aligned at the back.


Step 6
From the higher remains, I cut another block, but lowered it slightly and placed it in front of the piece from Step 5.


Step 7
I put small squares beside the first round.


Step 8
I cut 2 1/4 circles and placed them in front of the squares from Step 7.
Guess what…all done! Not to hard at all eh? Now it’s your turn – be sure to send me photos!


I didn’t take photos of how I iced the cake. As we live out in the country, I can’t buy fondant so I have had to make my

own. I found an excellent recipe at
Gingerbread House Heaven. I used their Professional fondant recipe and had great results even though our relative humidity was excessive – we were actually flooded in for 3 days while I made the cake! Luckily the water dropped and the roads opened in time for the party! I did the blue first and worked my way forwards. I made the wheels a few days earlier and dried them out completely so they were nice and hard, and then just stuck them on with a bit of left over buttercream. I sat the entire cake on a foil lined biscuit tin lid to raise it slightly off thecake board so that the wheels looked about the right level. As for the face, I had read another great tutorial over at
Thomas the Tank Engine TutorialTechnorati Tags:
tutorialand was going

to try and sculpt the face myself, but wimped out because my sculpting skills are very very ordinary! I got some oven bake polymer clay and made an imprint with one of Miss M’s toys. She has a puzzle that has plastic pieces that make a front on view of Thomas. I took the face piece, pushed it into the clay and baked the clay to make it hard. When I was ready to make the face, I coloured it grey, then pushed

a big piece over the mould and rolled it slightly with a rolling pin for even pressure. When I pulled the fondant off the clay, I had a wonderful 3 dimensional face! I used a round cutter (the same one I used for the circle pieces of cake so they were a perfect fit) to cut the face out, and then just added in the coloured details. It actually turned out to be quite a simple exercise once I broke it all down.
So now you know how to cut up the cake and put it back together again, you'll be ready to ice it.
Here is how I covered the cake in Part 2 of the tutorial.
Anyway, I hope you have found this helpful, and if you actually know what you are doing, I would love to hear about how I can improve my cake decorating – especially getting my fondant nice and even – it always has lots of lumps and bumps.